Squaresville Cookies
A friend asked for these, so I made them, then we packed them up and sent them to LA - apparently I used enough bubble wrap, I was afraid the icing might shatter with any impact. Not that I dropped any cookies on the floor...at least, none that I sent. (The icing shattered, who would send those?)
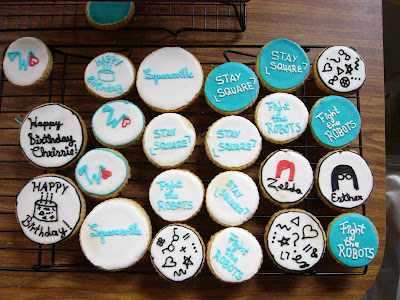


The final dozen-ish
So that is the final result.They were actually quite fun, since we weren't making four dozen of each, just a few different ones. I also got the chance to play around with meringue powder, which I haven't used before. The decorated cookies I have made so far all used an egg-white royal icing and lime juice, where these used a meringue powder one and lemon extract. It doesn't really make a difference in how to decorate them, I just wanted to err on the side of caution when shipping cookies across the country - the risk of salmonella is pretty small, but it can happen and I didn't want to accidentally poison the cast and creators of my friend's favourite show.
The cookies are pretty simple butter cookies, I found the recipe in a book on chocolate (Chocolade by Johann Lafer - apparently only available in German though) and still have not gotten around to actually chocolate-dipping them. Maybe with the leftovers this time?
The cookies are:
400g flour (yes, the recipe uses grams - I will try to find a conversion)
250g butter, cubed (cold is fine)
150g sugar
1 egg
pinch of salt
Toss it all in a bowl and mix together til it forms a smooth dough, then pat into a manageable shape, cover with plastic wrap, and chill for an hour or two.
The dough might look very crumbly for a while, but don't worry, it will come together. Eventually.
Once chilled, roll the dough out on a floured surface and cut into shapes. Bake at 350°F for about 10-12 minutes, but it can vary depending on how thick and how big your preferred shapes are. I check after about 8 minutes and then try to watch til they start getting a little brown around the edges.
If you are like me and don't roll out all your cookies consistently, some that are thinner or smaller will be a little darker. Since you obviously cannot send those to people, eat them instead.
Once the cookies are cooled, arrange them on your cooling rack (or any other dry, clean and flat surface).

Ready to go
Now make your icing.
I use the instructions and recipe found on Joy of Baking, both for egg white Royal Icing and the Meringue Powder version. Since everyone enjoys the lemon-lime taste of the egg-white version, I added a 1/4 teaspoon of lemon extract to the meringue powder version in place of the vanilla extract. You could probably add any other extract you like, too.

Starts out like this

Turns into this
Add your food colouring of choice

Sad Frosting wants to be loved...
This looks like a lot of food colouring, and it is a decent bit, but apparently royal icing takes more dye than say a buttercream for the same intense colour. I will let you know if I find out why - or if you do, please do tell, I'm curious!

Mix!

Looks appropriately murky.

Fill into pastry bag.
I used a number two tip for this, you can use whatever tip you want, but the point of this one is to make a border. Also, the frosting will be pretty stiff, that's how it should be. To move the icing down to the tip, turn the top of the bag and keep twisting it until it pushes down the icing. Since royal icing dries out quickly, cover the icing you are not using with plastic wrap (push it right onto the icing) and stick a damp paper towel in a cup. That way if you put down your pastry bag for a minute (say if you need to vent that your lines look drunk), or even overnight, the frosting won't dry out and clog the tip. Though if it does clog, just poke it with a toothpick til it unclogs.
Drawing lines: The point of this is to put a border around the edge of the cookie so you can fill it with more icing later - that icing will be much wetter and spill easily, so we create a barrier first.
Ideally you can keep the tip close to the cookie, not on it, but just above the line you are piping - too far up and you lose control over how the icing shapes itself, too low and you just smear icing all over the cookie without creating a real border, which makes for fun later.
I also recommend eating before piping and paying attention to your caffeine intake. I've managed some spectacularly bad lines while shaking just enough due to forgetting to feed myself or thinking two pots of Assam were a good idea. Or maybe I am the only one who does this, I wouldn't know.

Results should look something like this


You get the idea
Now, let the cookies dry. And try not to drop them.
Once the cookies are reasonably dry (poke one gently if you need to make sure) take some of the remaining icing and dye it whatever colour you would like, or not at all. Then add another teaspoon of water and stir to thin it out, add more water if you need to until the icing is thin enough that it combines back into itself in 10 seconds or so if you let it drop back in the bowl. If that makes no sense, here is a picture:

I wanted a black border with a white background for these, so this batch of icing is not colored with anything.
Now pour a teaspoon or so on your cookie and push it up to the edges, gently.

Once you have done this for all your cookies, go take a nap. Or clean up some of the mess you made, then take a nap. Since this icing has more water, it takes longer to dry. Sometimes overnight. So have some tea, read a book or get on with your day however you like, it's going to be a while.
This is how it looks when you pipe the border and when you don't::

Still tasted good though.
Once the icing has hardened, the fun starts!
Using the remaining piping icing in the bag, draw whatever designs you want. Since we were doing Squaresville cookies I used the black and white theme to draw some doodles. The good thing about doodles as a starting point is that they don't have to be perfect. So just have fun. If you have a few different piping tips lying around, you might want to switch to a small one for this, but it's up to you.
I used some of the Squaresville QandHey! videos and the artists posts as a guide to try to figure out the general style and color scheme, and what we wanted to put on them. It took a few attempts to get the size right for longer words like Squaresville (but I saw that one coming and made bigger cookies, just for that!), and the right size and style for the writing - I usually make a few extra cookies so there is room for experimentation and error.

The doodles were lots of fun.

So were these.
The different writing styles were fun to play with, I kept the x over the I from the Squaresville cursive logo for the Fight the Robots and the Happy Birthday cookies. I bracketed the Stay Square cookies with an L7, because it seemed like fun. There's really no other reason than that. It just seemed like a good idea at the time.

So at this point, just wait for the cookies to dry and then eat them! Or, threaten politely redirect any roommates that attempt to do so to the "extra bits" tin.

Our cookie tin.

Full of trial cookies that are still perfectly edible. Just not quite as pretty.
Then pack up all the cookies after taking a photo or two (hundred), wrap in layers of wax paper and bubble wrap, and hand over to the friend for shipping. Oh, and clean up your mess.

Not too bad...

And worth the trouble?

Wrapped in layers of wax paper.

All packed up

and ready to go.

Time for tea.

Comments
Post a Comment